Search This Blog

Saturday, March 30, 2013

Easter Table...

Food is usually what brings family and friends together. Here are some thoughts about putting together a beautiful table for Easter.


START WITH COLOR! IT IS THE MOST IMPORTANT TOOL YOU HAVE!
USE IT TO YOUR ADVANTAGE TO CREATE EYE APPEAL!

How to Make a Tablescape for Easter
1 Collect items from around your home that focus on Spring or Easter and pile them near the table you are decorating. Looking at the items you have selected, do you see a color scheme forming? Use light, bright, happy colors for a spring theme such as Easter.  Cover the table with a simple simple tablecloth or if you have a beautiful wood table and you don't want to hide it away, leave the tablecloth off for a more rustic feel.

2 Look at what you have collected. Consider fabrics, books, candle holders or candles, flowers, baskets, books, ornaments and bowls. The goal is to have a wide array of items from which to choose. Plan to take up no more than one-third of the table space with your decorative elements. Your guests need somewhere to place their food and drink without sending your beautiful decor flying. Place a table runner down the center of the table, and restrict your tablescape to this area.  Match decorative place mats and/or coasters with the table runner.  Set each place with plates, cutlery, glassware and add decoratively folded napkins next to each place setting. (Use light greens, soft yellows, creams and white with splashes of delicate, pastel colors for a spring or Easter display.)

3 Choose one item from your stash to act as the focal point. It needn't be the largest item, but should have an interesting shape or texture. Place this item on the table just to one side of the center.

4 Select other items which match your intended color scheme. Choose either a monochromatic scheme with shades of one color or a scheme that has a focal color and two accent colors.  Place these items on the table. Add the basic items that will make up your tablescape. Flower arrangements and candles are suitable for any theme, but the type of flowers you use and the colors and scents of candles should reflect the time of year. For example, use yellow and white candles with scents such as freshly mown grass or a summer breeze with daffodils in the spring. Easter eggs, chocolate bunnies and little chicks for an Easter theme tablescape. 

5 Decide if you want to have items that are all the same shape or if you want to have a variety of shapes. A tablescape of vertical candlesticks is as visually pleasing as one which features a round platter alongside a square box. Select the items that have the shapes that you want to feature and remove the rest from the table. Tall tapered candles, figurines, strands of beads, garlands, nosegays, and confetti may suit the theme or the time of year.

6 Examine the texture of the items on the table and choose a few that have contrasting textures. A hand-woven bowl has a much different texture than that of a polished brass candlestick. Select several pieces with the same texture and some with contrasting textures. Metallic objects will seem much harder than softer fabric ones. Aim for a mixture of hard and soft surfaces. Remove everything else from the table.

7 Select objects in a variety of sizes from those remaining on the table. Look for tall items for the back of the table and short items for the front. Consider also the width of the table and of the objects. Again, remove the objects that you will not be using.

8 Arrange the objects remaining on the table. Place the focal object to one side and the other items around it. Aim to cover only one third of the table. Place the larger items at the back of the table and the smaller ones at the front. Combine items, such as placing a small vase or statue on a stack of books, for added interest. Create a balanced tablescape by imagining central lines drawn on the table from side to side and from back to front. For each item placed on one side of the line, add one or two matching items on the other side. You don't need to have symmetry -- a heavy, tall object can be balanced by several smaller ones.  Suspend crystal beads or streamers from the ceiling to fill the space between the table and the chandelier.

Using these guidelines will help you decorate like a pro and impress your family and guests this Easter or use the same ideas for your next dinner party focusing on a different theme. Combining things you already have not only make your tablescapes more affordable but more personalized since these collected items have a special meaning to you. I hope everyone enjoys a wonderful Easter celebration surrounded by family and friends. Happy Easter!

Friday, March 22, 2013

According to the Calendar it's Spring

According to the calendar it's Spring...

Small grapevine wreath with birds nest

Spring began early Wednesday morning according to the calendar. We still are buried in snow and the high temperatures of  day are right around freezing. With Easter just around the corner, people are looking to bring a sign of the hope of warmer weather into their home. This week I did a few wall or door decorations that might inspire a feeling of a spring breeze rather than the burr of what we are experiencing.


Double birds nest adorned with ribbon &
flowers in blues and oranges.
 I like something other than that same old round grapevine wreath to use as a base for designing. Not that I don't or won't do them, but I like to be a little more creative. Be hones,t we all have a wreath if some sort. They are the "go to" door piece.

Plain spade
I went on a search for things to use for bases to embellish. I found a cute double birds nest that could be used as a table "set about" or to hang. I also found a mossy spade wall piece and matching rake. I found a moss garland I had never used but wanted to. Then I gave in and went for a small 8" grapevine wreath and a larger 16-18" wreath form.


Flower choices


Now to gather some adornments. I found a birds nest with a few eggs in the center.I chose some spring colored ribbon in blues, greens, multicolored butterflies and checks. Picked out a few favorite flowers in colors to match the ribbon. And grabbed a few fabric butterflies.
Ribbon added
Finished project

Next, I sorted my selections into pile of things I thought would look good together and tweaked some of the flower choices keeping the scale of the project in mind. When I do projects like this, I like to gather things all at once, then edit out things I don't need, rather than "shop" for each creation as I get ready to make it. This is a big time saver and you don't end up with everything but the kitchen sink in the "to use" pile.

Zip tied moss rake

Select a pretty little pile of spring and get to work. I use hot adhesive to secure most components in the designs but occasionally, I have something I can use a zip tie (cable or electrical tie) to attach the stems together. This  moss rake is a hydrangea, 3 astillbe, and a nest with a zip tie holding all the stems together to the handle of the rake. By using the plastic tie, it is a simple way of attaching things together as well as being very secure. It doesn't work on everything but it does have many uses.


My moss garland became a dimensional element on a grapevine wreath. I secured the roping in place with covered wire, glued on some buds and flowers (in a monochromatic color scheme) allowing for more dimension and space, added a few loops of ribbon and clipped the butterflies in place. This could easily be used flat on a table as well as on a wall or door.
Dimensional moss rope and butterfly wreath.


Hopefully, some of these thoughts of spring will hold us until the weather warms bringing us true signs of what's ahead. The blackbirds are back and I had a crocus bloom near my doorway today!

Monday, March 18, 2013

Flower Show....

My garden club held our spring flower show. This is a design group - we don't focus on gardening even though we are a  "garden club". We do two shows a year. All our members are designers. Most of us are also Flower Show Accredited Judges. All our members participate in both the design and horticulture classes.Traditionally we each enter 1-2 design Classes and at least 5 pieces of Horticulture. Because we are such a small club and several members were out of town or wintering down south, it is a very difficult show for us to pull off.

Spacial Thrust
Peony, Bamboo,  Equisedium
Our title was "Festivals on Parade". Each Class had a title of a country and a festival they hold. I participated in the a table class - "Holland Tulip Festival". Because my roots are in traditional design - when in doubt I compete in a Class calling for a completed centerpiece for a dining table. (So you know, I also competed in "Japanese Cherry Blossom Festival", a "creative" class calling for a spacial thrust design.) I  have come to know the simpler, or less complicated your table can be, usually the better it places. I know color is a huge part of the overall table, so I knew I wanted to emphasize that as well.

FYI: Things required in a Functional Table Class are a table covering, plate, napkin, beverage service and the arranged centerpiece. Flowers in a vase don't cut it. You can also include a placemat or runner, and any accessories that portray the theme. No silverware, please.

I began by searching my house for anything Dutch. Then I asked everyone I knew if they had a wooden shoe, a windmill, Dutch figurines, or a piece of Delft in which to arrange my flowers. I checked the Holland flag - red, white and blue, like ours- that could be confusing.  Nothing turned up. I went a different route thinking I would use tulips (of course), most likely yellow (because I like them), and blue and white to imply Delftware. I had a white table cloth and I own white dishes, knowing I would need a plate and a cup and saucer or a mug. I was feeling like it was going to come together.

Then, I made rounds to Goodwill and both Salvation Army stores. I was in luck, I found a blue and white toile-ish bowl, a placemat that was the blue I had in mind, a mug in the same color, a set of 6 matching napkins and a yellow table runner. For the most part, mission accomplished. Then I got a text and a phone call about possible "wooden" shoes I could borrow. I went with the plain brown ceramic one. I figured I could set it on the table somewhere once I saw how large it was, which would be the day of the show. Wow, just need to order the flowers.

Blue and white with yellow accents - theme colors. Flowers: yellow tulips and light blue delphinium. My box of flowers arrived and I received dark blue larkspur. No.....but wait, I get another order tomorrow. Saved! I called and ordered the delphinium- luckily they had them. I was relieved when I opened the box and they were the perfect color! Relief.

But, what about the TULIPS? After all of this, I had forgotten about them. They never came. So, Pick and Save here I come! Luckily, they had a nice assortment and they had yellow. Bonus, they were on sale!

If a centerpiece is required for entry, I usually make my arrangement at home the night before "just in case" anything that can go wrong does. I feel safer delivering a finished design than taking all the parts in the car and trying to put it together with everyone talking to me and hassling all about. Probably a hold over from my flower shop days. If its a creative design, since those require less materials, I feel those should be done on sight to get the size correct.

So, this is what my blue ribbon winner functional table looked like:


I had my blue delphinium and yellow tulip centerpiece arranged in a white container. I noticed it had leaked overnight, so I put a saucer underneath which changed the proportion a bit. To break up all that white I used the yellow table runner as a placemat, but let it hang over for fun. I folded the napkin like a candle and laid it on the plate, again to break up the white. I tucked the BIG brown shoe slightly under the flowers to hopefully make it look a little smaller. Lucked out. The Judges liked it

By the way, my cactus which was blooming won an Award of Merit.

Friday, March 15, 2013

Integrated Ikebana

Integrated Ikebana...
Greater Chicago Ichiyo Ikebana's last workshop focused on integrated ikebana where two members combined to form one large exhibition style arrangement. We paired up in teams and then began to select our containers. All members had brought two containers and placed them on a table. We mixed and matched to find a combination that had similar qualities - color- shape- size.

Gaby and I were teamed up. We picked one Nageire (tall) and one Moribana (low) container that were similar in color. We also decided we would like to incorporate a nested set of baskets to use as a kubari to support our materials.

For line material we used a golden lucodendron, for color - tulips and yellow iris, and camellia foliage for depth - all warm colors.

Working together was fun. We each had our input and you can see the result below covering a 6 foot table.


Integrated ikebana - team work!
Each design needed to look completed on its own. Similar, but not necessarily the same materials were chosen for each design. The designs "talked" to each other, not compete with each other.
I completed the moribana half of the design.
The tulip petals were reflexed to expose more color and create
added interest.
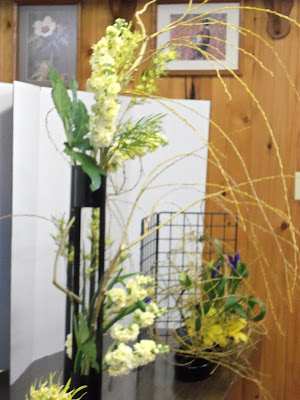
These are some of the other completed designs:

Switch up - a tall arrangement in a low container with a low arrangement in the tall one.
Budded branched are featured in this combination.

Two tall black metal containers with flowing weeping willow
combine with a low design in a black container featuring a ball of willow
and a metal grid.

Monday, March 4, 2013

Decided to clean out my purse ...Part 2


Yes, it should lay flat
if it's not overstuffed!

Decided to clean out my purse...Part 2

Know that it's been a few days, I have found a couple more items for use in your bag - a metal credit card holder that blocks thieves from skimming the chip in some credit cards (indicated with a wave emblem) with your bank information embedded in it, and a little hook that you can hang your purse from in a restaurant, etc. to keep it off the floor. 

On to organizing:

  • Dump everything out, pitch the trash and wipe everything down along with the lining of your purse.
  • Purge all duplicates - you know you don't need 10 pens!

  •  Divide everyday essentials into categories: money, personal care and communication tools. Stuff you store for "just in case", I have another plan for which I will discuss later.
  • Use all those cute organizing containers - or even zip lock bags, to compartmentalize all "the stuff" you need daily. Containerize with the appropriate size containers - make up, meds/hand sanitizer and cream, breath mints and a small snack, business and loyalty cards. Take advantage of any lining pockets to distribute your items.
  • Since they are out, make copies of your credit cards and your ID's to keep at home in case the originals are lost or stolen. Place these in your wallet or credit card holder to avoid demagnetizing the reader strip. Be sure to replace then after each use. This way it's easy to see that they are all accounted for. (Don't use certain cards frequently? Store them at home.)
  • File your receipts- don't let them linger in your wallet.
  • Your purse is not the place to collect coins - empty once a week in a jar or use it! It does spend same as the bills, ha!
  • Once a week clean out your purse - while you are waiting at a lesson for your child or every Sunday night to get you organized for the week ahead.
  • Keep your extra cell charger, make-up bag (filled with sample size- not full size containers), extra shoes - stashed in your desk, not your purse.
  • A small collapsible tote is good for the environment - but, please, refold it after use.
  • Remember, health wise, your purse should not weigh over 3 pounds!
For those "Just in case" items, or things you seldom use - store them in your car:
  • Keep your coupons in an expandable file or binder.
  • Your gym clothes belong there too. 
  • Small hook to suspend your purse from a table
    to keep it off the floor and keep clean.
  • Have a zippered case for anything else.
Finally, respect your purse. Remember,it's not a long term storage bin.